I know many people feel nervous about cooking a turkey, especially for a big holiday like Thanksgiving. You might believe some common myths. For instance, basting is not essential for a moist turkey; I found it just cools your oven. Also, those pop-up timers are often unreliable, leading to dry meat. I promise you a foolproof guide to achieving a moist, flavorful, and perfectly cooked turkey every single time. Learning how to cook a turkey does not have to be intimidating. This guide will make your classic Thanksgiving turkey a success. It will be a rewarding experience for your next Thanksgiving feast.
Essential Preparations for Your Turkey
Before you even think about putting your turkey in the oven, some important steps ensure success. I always start with careful preparation. This makes the entire cooking process much smoother.
Choosing the Right Bird
Selecting the right turkey is your first step to a delicious meal. You have many choices. I have seen Heritage Turkeys, which come from older breeds. They often have a stronger flavor. You can also find fresh mail-order turkeys, sometimes already brined. Sustainable and organic options are available too. These birds often have better flavor because of how farmers raise them. For example, organic turkeys come from birds fed organically grown feed and given outdoor access. This leads to a finer taste.
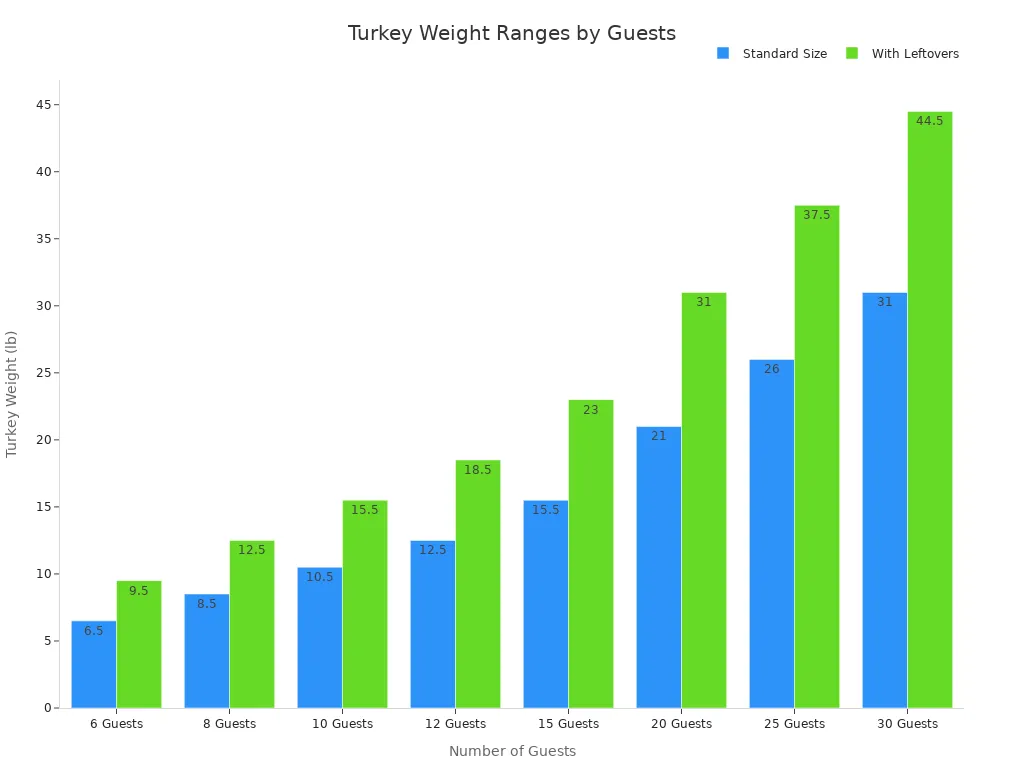
When you choose your bird, consider how many people you will feed. I plan for about 1 pound per person for the meal. If you want leftovers, I suggest 1½ pounds per person. For example, a 10-person Thanksgiving meal needs a 10–11 lb turkey. If you want leftovers, you need a 15–16 lb bird. For larger groups, I find cooking two medium turkeys is better than one very large one. This helps with even cooking. If you prefer turkey breast, aim for ¾–1 pound per person.
Guests | Standard Size (lb) | With Leftovers (lb) |
|---|---|---|
6 | 6–7 | 9–10 |
8 | 8–9 | 12–13 |
10 | 10–11 | 15–16 |
12 | 12–13 | 18–19 |
15 | 15–16 | 22–24 |
20 | 20–22 | 30–32 |
25 | 25–27 | 37–38 |
30 | 30–32 | 44–45 |
Safe Thawing Methods
Thawing your turkey safely is very important. I always follow USDA guidelines. The refrigerator method is what I strongly recommend. Allow one day of thawing for every 4–5 pounds of turkey. So, a 16 lb whole turkey needs about 4 days. Once thawed, it stays safe in the fridge for two more days.
You can also use the cold water method. Keep the turkey in its original packaging. Submerge it in cold water. You must change the water every 30 minutes. This method takes about 30 minutes per pound. A 16 lb turkey takes about 8 hours. Cook the turkey immediately after thawing it this way.
Gathering Your Tools
Having the right tools makes cooking a turkey much easier. I always gather my equipment before I start. A good meat thermometer is essential. It ensures your turkey cooks to the correct internal temperature. This prevents raw spots. A large carving board with a juice groove is also very helpful. It keeps your counters clean when you rest and carve the bird. I also use a sharp carving knife. It helps me maneuver around bones and get clean slices. Butcher’s twine is useful for trussing the bird. These tools help me with any turkey recipe. They make the entire Thanksgiving cooking process less stressful.
Flavorful Turkey: Brining & Seasoning
Making your turkey flavorful is key to a memorable meal. I always focus on brining and seasoning. These steps add so much taste and moisture.
The Power of Brining
Brining is a game-changer for turkey. It makes the meat incredibly moist and flavorful. When you brine the turkey, salt ions enter the muscle tissue. This process helps the meat absorb more water. The salt also changes the muscle proteins. They unwind and swell. This increases their ability to hold water. This means the meat retains moisture better during cooking. The proteins resist shrinking. This prevents water from being squeezed out. This is why brining makes such a juicy turkey. It can increase the meat’s weight by 10% or more. This leads to greater moisture after cooking.
Dry Brine vs. Wet Brine
You have two main options to brine the turkey: dry or wet. I prefer dry brining for its simplicity and crispy skin results. For a dry brine, you rub the turkey with a salt mixture. This mixture often includes kosher salt, black pepper, garlic powder, onion powder, smoked paprika, dried thyme, and lemon zest. Sometimes, I even add chopped apples to the mix. You apply this rub directly to the turkey’s skin and under it. Then, you let it sit in the refrigerator for a day or two.
Wet brining involves submerging the turkey in a saltwater solution. This solution often contains herbs and spices. Both methods help to brine the turkey effectively. They both lead to a more tender and flavorful bird.
Herb & Spice Rubs
Beyond brining, a good herb and spice rub adds another layer of flavor. I love experimenting with different combinations. A classic Thanksgiving turkey recipe often uses a blend of rosemary leaf, ground sage, thyme leaf, and parsley flakes. I also include sea salt, garlic powder, onion powder, and medium grind black pepper. You rub this mixture all over the turkey. This creates a delicious crust. This simple step makes a big difference in the final taste.
Perfect Roasting: How to Roast a Turkey
Now, we move to the heart of the matter: roasting your turkey. This is where all your careful preparations come together. I will guide you through the process to ensure a perfectly cooked bird.
Oven Temperatures & Timing
Setting the right oven temperature is crucial for a successful roast. I always start by preheating my oven. You can choose a few approaches. Some people like to start with a high temperature, like 425°F for the first hour, or even 500°F for 30 minutes, to kickstart browning. Then, they reduce the heat. However, I find a steady 325°F works best for cooking a whole turkey. Chefs consistently agree on this temperature for even cooking and moisture retention. This temperature is a sweet spot. It allows the turkey to cook through while keeping the meat moist. It also helps achieve golden-brown skin without overcooking. A steady 325°F is hot enough to cook the bird thoroughly and low enough to retain juiciness. It provides a steady cooking rate. This dry heat facilitates a slow, even cook that helps retain moisture. It promotes browning, prevents burning, and cooks steadily without drying out.
For an unstuffed turkey, I plan about 13-15 minutes per pound at 325°F. If you stuff your turkey, allow about 15 minutes per pound. Always place your turkey breast-side up on a rack in a shallow roasting pan. This allows air to circulate around the bird. If you are only cooking a turkey breast, it typically takes 1.5-2 hours, or about 15-20 minutes per pound, at 325-350°F. This roasted turkey recipe ensures a delicious outcome.
Achieving Crispy Skin
Everyone loves crispy turkey skin! I have a few tricks to achieve this. First, pat the turkey dry with paper towels before seasoning and cooking. This removes surface moisture, which is key for crisping. I also like to increase the oven temperature to 425°F after an initial cooking period. This helps crisp the skin beautifully.
You can also try starting your turkey at a high temperature and then reducing it. I have seen reports of people starting at 500°F and then reducing to 350°F. This approach yields a “perfect in every fashion” turkey with “crispy skin.” This method creates perfectly crispy skin when you do it right. You can also baste the turkey with melted butter. This helps with browning and crisping the skin, but remember, it does not add moisture to the meat itself.
Monitoring Internal Temperature
This step is non-negotiable. You must use a meat thermometer to ensure your turkey is safely cooked. I never rely on pop-up timers. The USDA recommends a safe internal temperature of 165°F (74°C) for all poultry, including whole turkey, turkey breast, and other parts.
Food Type | Internal Temperature (°F/°C) |
|---|---|
Chicken, turkey, and other poultry (including whole bird, breasts, legs, thighs, wings, ground poultry, giblets, sausage, and stuffing inside poultry) | 165°F (74°C) |
For accurate readings, insert the thermometer probe into the thickest part of the breast or thigh. Avoid bones. Bones conduct heat differently and can give you a false reading. I aim horizontally from near the neck cavity, ensuring the tip is about 1/2 to 1 inch from the internal cavity. This places the probe in the “thermal center,” the point furthest from the exterior that takes the longest to cook. For oven-safe probes, insert them lengthwise so the tip rests in the center. You can also insert an additional probe into the thigh or wing for more comprehensive coverage, again avoiding bones or gristle. This ensures your Thanksgiving turkey is safe and delicious.
Tenting for Juiciness
After your turkey reaches the correct internal temperature, do not carve it immediately! This is a common mistake. Resting is crucial for a juicy turkey. I always remove the turkey from the oven and tent it loosely with foil. Jessica Randhawa, a chef, states she tents her turkey and lets it rest for about 30 minutes.
This process allows the turkey juices to redistribute for maximum juiciness. James Hackney, another executive chef, emphasizes that covering the turkey with foil after cooking is essential. He explains that resting allows the meat to relax. The foil helps trap heat. This allows juices to be reabsorbed. This results in more tender, moist, and flavorful meat. I usually let my turkey rest for at least 20-30 minutes, sometimes even longer for a very large bird. This simple step makes a huge difference in the final texture and flavor of your roasted turkey recipe.
The Final Steps: Resting & Carving

You have cooked your turkey perfectly. Now, two final steps remain. These steps are just as important as the cooking itself. They ensure your turkey is juicy and easy to serve.
Why Resting is Crucial
I always tell people: do not cut your turkey right away! Resting is a critical step. It makes the meat incredibly juicy. During cooking, muscle fibers contract. They push juices to the center of the meat. If you cut the turkey immediately, these juices will gush out. This leaves you with dry meat.
Resting allows the muscle fibers to relax. It lets the flavorful juices redistribute throughout the meat. This means every slice stays moist and tender. Some people think muscle fibers are like balloons, but they are not. Water moves between compartments. It is not trapped in fibers. Resting allows the hot, dry outer fibers to absorb liquid from the center. This reduces juice loss when you cut the meat.
Proper Resting Techniques
I follow a simple process for resting my turkey. After I remove the turkey from the oven, I let it rest for at least 30 minutes. For a very large whole turkey, I might let it rest for up to an hour. I place the turkey on a rack inside a roasting pan. This allows air to circulate. I do not cover the turkey tightly with foil. Covering it tightly can make the skin soggy. I want that crispy skin I worked so hard to achieve. Leaving it uncovered helps maintain the crispness. This resting period is crucial. It prevents dryness, especially in the breast meat.
Carving Like a Pro
Carving a turkey can seem daunting. With the right tools and technique, it is easy. I use a good carving knife. A long, sharp Western steel knife works best. An 8-inch chef’s knife or a dedicated carving set is ideal. I also use a cutting board with a juice groove. This catches any remaining juices.
First, I remove the legs and thighs. I cut through the skin between the leg and body. Then, I push the leg away from the body. I cut through the joint. Next, I remove the breast meat. I cut along the backbone. I carefully slice the breast from the bird. I place the removed breast meat skin-side down on the cutting board. I slice the breast across the grain. I use long, even cuts. This gives me uniform slices. This ensures every piece is tender and delicious. It completes a perfect roasted turkey recipe.
I showed you how to cook a turkey perfectly. It is achievable with the right steps. I covered proper thawing, brining, roasting, and resting. These techniques ensure a moist and flavorful bird. You now know how to cook a turkey. This guide helps you prepare a delicious Thanksgiving turkey for your Thanksgiving celebration. You can cook a turkey for any Thanksgiving occasion. Apply these methods for your next Thanksgiving turkey. Enjoy your perfectly cooked, delicious turkey!